> For the complete documentation index, see [llms.txt](https://docs.datasaur.ai/llms.txt). Markdown versions of documentation pages are available by appending `.md` to page URLs; this page is available as [Markdown](https://docs.datasaur.ai/agent/labeling-agent/span-labeling-agent.md).
# Span Labeling Agent
Use a span labeling agent when you want a model to automatically apply labels to [Span Based](https://docs.datasaur.ai/data-studio-projects/lets-get-labeling/span-based#adjust-span-selection) project type. This is useful for tasks such as named entity recognition, information extraction, and other text annotation workflows where the model needs to highlight and classify specific text spans.
A span labeling agent works alongside human labelers, so you can compare model output, review quality, and measure performance in the same project.
{% hint style="info" %}
Models must be deployed in [**LLM Labs**](/llm-projects/deployment.md) in the same team workspace as the Data Studio project.
{% endhint %}
### Before you begin
Before assigning a span labeling agent, make sure you have:
* a deployed model in LLM Labs
* a span labeling project in Data Studio
* a label set prepared for the project
* prompt instructions that clearly define what spans the model should label
### How span labeling agents work
For span labeling projects, the labeling agent reads the input text and returns predicted spans based on the label set you configure. The output is then applied in the project as model-generated annotations.
A typical setup flow looks like this:
{% hint style="info" %}
Pre-requisite: [Deployed model in LLM Labs](https://docs.datasaur.ai/agent/labeling-agent)
{% endhint %}
1. Assign the deployed model as a labeling agent in Data Studio
2. Launch the project and review the generated labels
### Assign the model as a span labeling agent
To assign a deployed model as a labeling agent:
1. Go to **Projects** and click **Create new project**.
2. Upload your files and Select **Span Labeling**.
3. Configure Labeler’s tasks, you can also enable *Allow arrows to be drawn between labels* checkbox if needed.
4. In the **Assignment** step, open the **Labeling agents** tab.
5. Select the deployed models you want to assign as labeling agents.
Selecting deployed LLM Labs Sandbox as labeling agent
6. You need to set the agent task by clicking Set a default agent task or Set task scope on individual labeling agent, and complete the project setup.
#### Configure span labeling tasks
Configuring labeling agent tasks - Span Labeling
You can configure:
1. **Label set**: the label set the agent should use.
2. **Allow the labeling agent to apply arrow**: available only if *Allow arrows to be drawn between labels* is enabled during project setup.
**Allow the labeling agent to apply arrow:** this option is only available if you enable *Allow arrows to be drawn between labels* checkbox in Labeler’s tasks step. Once enabled, you can select the label set for the arrow labeling task.
{% hint style="info" %}
You can assign both human members and labeling agents. Each model counts toward your assignment limit.
{% endhint %}
### Assign a span labeling agent from Project Settings
You can also assign labeling agents to a project that has already been created, without going back through the Project Creation Wizard.
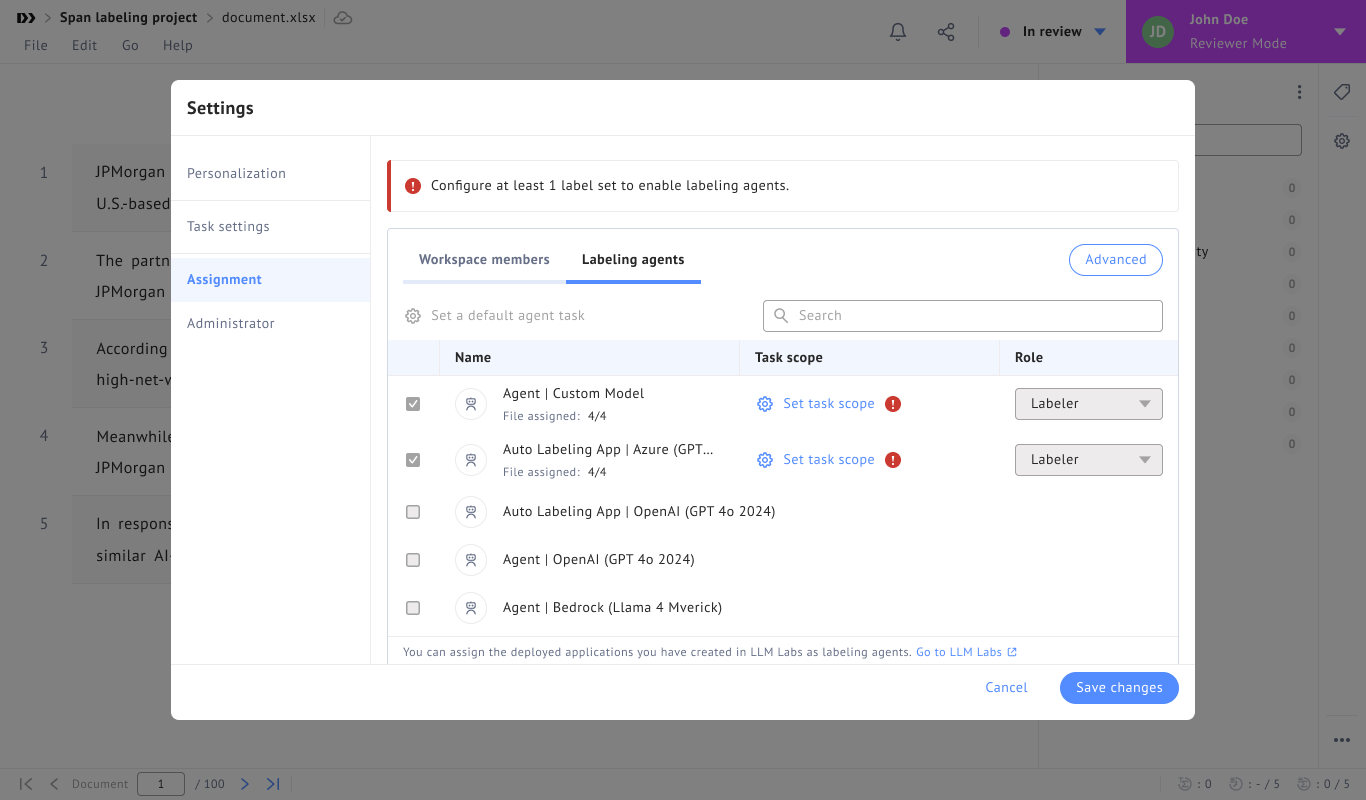
1. Open the project and go to **File** > **Settings** > **Assignment**.
2. Open the **Labeling agents** tab.
3. Select the deployed models you want to assign, then set the agent task with **Set a default agent task** or **Set task scope**. This works the same way as in the Project Creation Wizard — see [Configure span labeling tasks](https://docs.datasaur.ai/agent/labeling-agent/span-labeling-agent#configure-span-labeling-tasks).
Configuring labeling agent through project settings
4. Click **Save changes**.
5. If you assigned a new agent or changed an existing agent's task scope, the **Rerun labeling agent** dialog appears. Agents marked *Newly added* or *Modified* are selected by default. Adjust the selection if you only want to rerun some of them.
image
6. Click **Rerun**, then wait for the agents to finish and review the generated labels in the project.
{% hint style="info" %}
Use **Save** and configure the rerun dialog when you want predictions to start immediately. Saving without running keeps the new assignment but leaves the agents idle until you trigger a rerun.
{% endhint %}
***
### Launch the project and trigger labeling
When you click **Launch project**, the span labeling agent automatically starts labeling the assigned data.
The generated labels can then be reviewed in the project just like other annotations.
### Review labels applied by the labeling agent
Once the project has been labeled, reviewers can inspect the annotations to verify:
* whether the correct text spans were selected
* whether each span was assigned the correct label
* whether model output is consistent across similar examples
This review step is recommended before submission, export, or downstream use.
### View and compare performance
You can track the performance of both human labelers and labeling agents from the [Analytics page](https://docs.datasaur.ai/workspace-management/analytics).
From there, you can compare IAA scores and other quality metrics across all labelers, including both humans and models.
### Limitations
* Each span can only have one label.
* Model performance depends heavily on prompt quality and label definition clarity.
* A labeling agent that has already been assigned cannot be unassigned.
.png?alt=media)
.png?alt=media)